Welding is one of the most critical skills in modern manufacturing and construction, and having the right Miller welding settings can make all the difference in achieving professional results. Whether you're a seasoned welder or just starting out, understanding how to configure your Miller welder correctly is essential for producing high-quality welds. This guide will walk you through everything you need to know about Miller welding settings, from the basics to advanced techniques, ensuring you achieve the best possible outcomes.
Miller welding machines are renowned for their durability, precision, and versatility. However, getting the most out of your Miller welder requires more than just turning it on and starting to weld. Proper configuration of welding settings is crucial to ensure safety, efficiency, and the quality of your welds. In this article, we'll delve into the intricacies of Miller welding settings, covering everything from power output and wire feed speed to advanced techniques for specific materials.
By the end of this guide, you'll have a thorough understanding of how to fine-tune your Miller welder for optimal performance. Whether you're working on automotive repairs, structural steel projects, or custom fabrication, mastering Miller welding settings will elevate your welding skills and help you produce professional-grade results every time.
Read also:Is Kaitlan Collins A Man Unveiling The Truth Behind The Controversy
Table of Contents:
- Introduction to Miller Welding Settings
- History of Miller Welders
- Key Miller Welding Settings
- Miller Welding Settings for Different Materials
- Wire Feed Speed and Voltage
- Choosing the Right Shielding Gas
- Common Issues and Troubleshooting
- Safety Tips for Miller Welding
- Advanced Techniques for Miller Welders
- Conclusion and Call to Action
Introduction to Miller Welding Settings
Miller welding machines have long been a staple in the welding industry due to their reliability and performance. However, achieving the best results with a Miller welder requires a solid understanding of the various settings available. Proper configuration of these settings can significantly impact the quality of your welds, making it essential to familiarize yourself with the key parameters involved.
Understanding the Basics
Miller welding settings primarily involve adjusting voltage, wire feed speed, and shielding gas flow. Each of these parameters plays a crucial role in the welding process, affecting factors such as penetration, bead appearance, and overall weld quality. Understanding how these settings interact is the first step toward mastering Miller welding.
Why Miller Welding Settings Matter
Proper welding settings not only enhance the quality of your welds but also improve safety and efficiency. Incorrect settings can lead to issues such as poor penetration, excessive spatter, or weak welds. By mastering Miller welding settings, you can avoid these problems and ensure consistent, professional results every time.
History of Miller Welders
Miller Electric Manufacturing Co. was founded in 1929 by Roy A. Miller in Appleton, Wisconsin. Over the decades, Miller has become synonymous with quality and innovation in the welding industry. The company's commitment to excellence is evident in its wide range of welding equipment, from portable MIG welders to industrial-grade machines.
| Founder | Roy A. Miller |
|---|---|
| Year Founded | 1929 |
| Headquarters | Appleton, Wisconsin, USA |
| Key Products | MIG, TIG, and Stick Welders |
Key Miller Welding Settings
When configuring your Miller welder, there are several key settings to consider. These include voltage, wire feed speed, shielding gas flow, and polarity. Each of these settings can be adjusted to suit the specific requirements of your welding project.
Read also:Prince Net Worth A Comprehensive Look At The Music Icons Wealth And Legacy
Adjusting Voltage
Voltage is one of the most critical settings in welding. It determines the heat input into the weld and affects factors such as penetration and bead appearance. For most applications, a voltage range of 18 to 25 volts is sufficient. However, the exact voltage required will depend on the material thickness and type.
Wire Feed Speed
Wire feed speed controls the rate at which filler material is fed into the weld. A faster wire feed speed increases the amount of material deposited, while a slower speed reduces it. Finding the right balance is essential for achieving a smooth, consistent weld bead.
Shielding Gas Flow
The shielding gas protects the weld pool from atmospheric contamination, ensuring a clean, strong weld. The flow rate of the shielding gas should be adjusted based on the welding environment and material being used. A flow rate of 15 to 30 cubic feet per hour (CFH) is typical for most applications.
Miller Welding Settings for Different Materials
Different materials require specific welding settings to achieve optimal results. Whether you're working with steel, aluminum, or stainless steel, understanding the unique characteristics of each material is crucial for successful welding.
Steel Welding Settings
Steel is one of the most commonly welded materials and typically requires a voltage range of 20 to 25 volts and a wire feed speed of 150 to 300 inches per minute (IPM). A shielding gas mixture of 75% argon and 25% carbon dioxide is often recommended for steel welding.
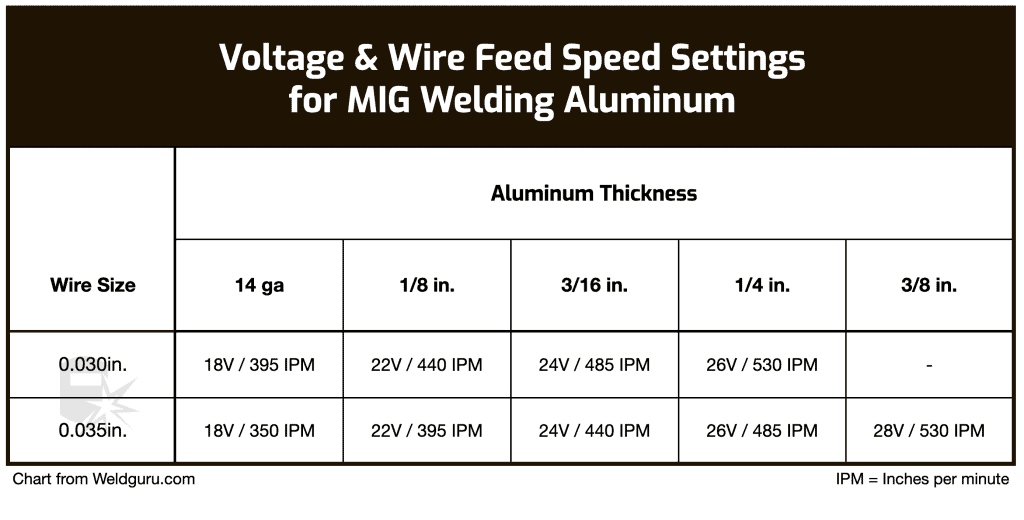
Aluminum Welding Settings
Aluminum welding requires a higher voltage setting, typically in the range of 22 to 28 volts, and a wire feed speed of 200 to 400 IPM. Pure argon shielding gas is usually preferred for aluminum welding due to its ability to produce clean, high-quality welds.
Stainless Steel Welding Settings
Stainless steel welding requires careful attention to heat input to avoid warping and discoloration. A voltage range of 18 to 24 volts and a wire feed speed of 150 to 300 IPM are typically recommended. A shielding gas mixture of 90% helium, 7.5% argon, and 2.5% carbon dioxide is often used for stainless steel welding.
Wire Feed Speed and Voltage
Wire feed speed and voltage are two of the most important settings in Miller welding. These parameters directly affect the quality of the weld and must be carefully adjusted to achieve the desired results.
Optimizing Wire Feed Speed
To optimize wire feed speed, start with the manufacturer's recommended settings and adjust as needed based on the material thickness and type. A faster wire feed speed can increase productivity but may lead to excessive spatter if not properly controlled.
Adjusting Voltage for Optimal Results
Voltage adjustments should be made gradually to avoid sudden changes in heat input. Increasing the voltage will increase penetration, while decreasing it will reduce penetration. Finding the right voltage setting is crucial for achieving a strong, clean weld.
Choosing the Right Shielding Gas
The shielding gas used in welding plays a critical role in the quality of the weld. Different materials require different shielding gases, and selecting the right gas is essential for achieving optimal results.
Common Shielding Gas Types
- Argon: Ideal for aluminum and stainless steel welding
- CO2: Often used for steel welding due to its deep penetration characteristics
- Helium: Provides high heat input and is often used for stainless steel and aluminum welding
Common Issues and Troubleshooting
Even with proper configuration, issues can arise during the welding process. Understanding common problems and how to troubleshoot them is essential for maintaining consistent, high-quality welds.
Excessive Spatter
Excessive spatter is often caused by incorrect voltage or wire feed speed settings. Adjusting these parameters can help reduce spatter and improve weld quality. Additionally, ensuring proper shielding gas flow can also help minimize spatter.
Poor Penetration
Poor penetration is typically caused by insufficient voltage or wire feed speed. Increasing these settings can improve penetration, but care must be taken to avoid overheating the material. Using the correct shielding gas can also help improve penetration.
Safety Tips for Miller Welding
Safety should always be a top priority when welding. Proper safety precautions can help prevent accidents and ensure a safe working environment.
Personal Protective Equipment (PPE)
Always wear the appropriate PPE when welding, including a welding helmet, gloves, and protective clothing. This equipment helps protect against UV radiation, sparks, and other hazards associated with welding.
Work Area Safety
Ensure your work area is well-ventilated and free of flammable materials. Keep a fire extinguisher nearby in case of emergencies, and always follow proper welding procedures to minimize risks.
Advanced Techniques for Miller Welders
Once you've mastered the basics of Miller welding settings, you can explore advanced techniques to further enhance your welding skills. These techniques can help you achieve even better results and take your welding projects to the next level.
Pulse Welding
Pulse welding involves alternating between high and low current levels to control heat input. This technique is particularly useful for welding thin materials or when working with heat-sensitive materials like stainless steel.
Hot Start and Arc Force
Hot start and arc force are advanced features found on many Miller welders. Hot start helps initiate the arc more easily, while arc force improves arc stability and control. These features can be especially beneficial when working with difficult materials or in challenging welding conditions.
Conclusion and Call to Action
Mastering Miller welding settings is essential for achieving professional-grade results in your welding projects. By understanding the key parameters involved and how they interact, you can fine-tune your welder to suit the specific requirements of your work. Whether you're welding steel, aluminum, or stainless steel, proper configuration of your Miller welder will help you produce strong, clean welds every time.
We encourage you to put this knowledge into practice and experiment with different settings to find what works best for your projects. Don't forget to share your experiences and insights with the welding community, and consider exploring other articles on our site for more tips and techniques. Together, we can continue to elevate the art and science of welding.